Record Your Viewfinder While Taking Photos
How to record your camera’s live view feed while shooting stills, for better tutorials, BTS content, and teaching
You’ve seen it: a photographer shooting stills with a mysterious box mounted on their camera.
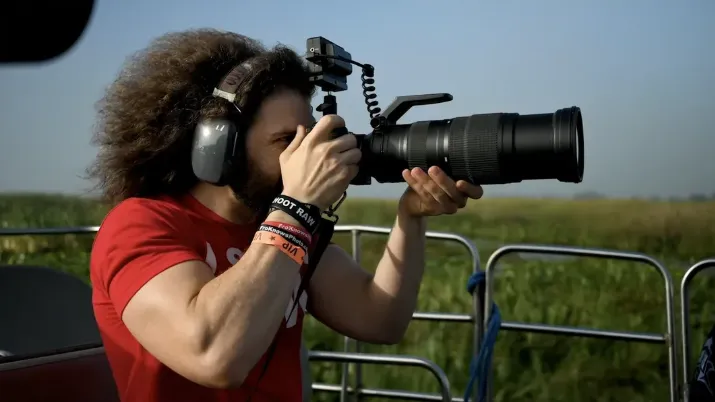
Are they recording video and photos at the same time?
Most of the time, they’re not recording “video + photos at the same time.”
They’re recording the camera’s live view feed (screen/EVF output) through HDMI, while still shooting photos normally.
That’s why viewers can see the exact decision-making: focus box, exposure changes, zebras, peaking, missed shots, keepers, and the moment the shutter fires.
Still choosing a system? Here’s my DSLR vs mirrorless breakdown.
What the “box” usually is
It’s typically one of these:
- An external monitor-recorder (records HDMI input to a video file), like the Atomos Ninja V
- A phone-based HDMI adapter that turns your phone into a monitor/recorder, like the Accsoon SeeMo
In both cases, the flow is simple:
- Camera HDMI out
- Recorder/Adapter
- Records the live view feed
3 ways creators capture POV while shooting photos
1. External monitor-recorder
This is the classic “box on top” setup.
Why creators use it
- Most reliable for longer shoots
- A bigger screen helps with focus and exposure
- Records directly from the HDMI input to edit-friendly formats
Tradeoffs
- Bulk and weight
- Batteries, media, mounts, cable management (common adds: NP-F970 batteries, SSD like Samsung T7, cold shoe mount)
2. Phone as the recorder (lightest kit)
A small HDMI-to-phone adapter uses your phone as the screen and recorder.
Why creators use it
- Minimal kit
- Easy for travel
- Fast POV clips for short-form
Tradeoffs
- App-based workflow
- Cable strain and connection stability matter more
3. Second-angle camera (great story, not true POV)
An action cam or a small camera aimed at your camera.
This is useful for “vibes” and context, but it is not the viewfinder feed.
The setup checklist (built to avoid the usual failures)
Step 1: Confirm HDMI live view works in photo mode
Most mirrorless cameras can output live view via HDMI. Some behave differently between photo mode and video mode.
Quick test: plug in, hit live view, record 10 seconds, playback.
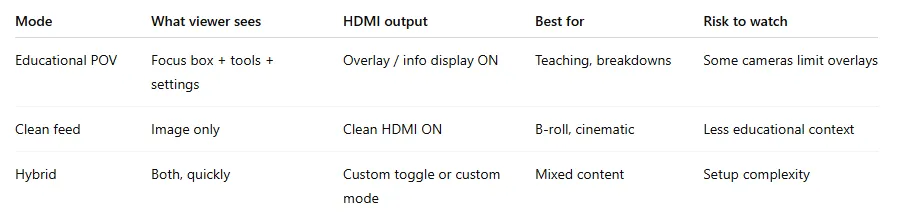
Step 2: Decide what you want to record
You have two outputs:
- Clean feed: image only
- Overlay feed: focus box + exposure tools + settings (best for teaching)
The key gotcha: some cameras limit overlays over HDMI, especially in photo mode. If overlays vanish, your camera may only output clean or only output overlays in certain modes.
Step 3: Set stable HDMI output settings
This avoids dropouts and lag.
- Resolution: 1080p is usually enough for POV “screen capture”
- Frame rate: 24/30/60 based on your content style
- If you get lag or flicker, drop output resolution or simplify overlays
Step 4: Lock the cable and mount (this is what saves shoots)
Most failures are physical, not technical.
- Use a short HDMI cable(example: Kondor Blue Micro HDMI to HDMI)
- Add strain relief (clamp, cage, or simple tether. Example: SmallRig HDMI Cable Clamp). If you use a cage: SmallRig camera cage + clamp
- Mount so the recorder doesn’t block camera buttons
- Route the cable away from your shutter hand
If you want a “pro workflow” angle, my Photography studio setup guide can help.
Step 5: Power plan
Recorders and phones drain faster than expected.
- Bring more power than you think you need
- If your setup allows it, use external power (example:Anker PowerBank USB-C)
Step 6: Audio choice (optional)
If your POV clip is mostly educational overlays, scratch audio can be enough.
If you want a clean voice, plan it intentionally.
Step 7: Do a “menu test” before you shoot
One more common failure: your recorder captures menus because the camera mirrors the display output.
Do this once:
- Hit record
- Open your camera menu
- Confirm what shows up in the recording Then adjust the HDMI display settings so you record live view only.
Common gear choices
- Atomos Ninja series (compact monitor-recorders)
- Blackmagic Video Assist (HD/HDR options)
- Accsoon SeeMo (phone-based adapter)
This is the same mindset as my post on essential photography gadgets.
Settings templates (comparison table)
The “do this once, keep forever” camera checklist
- HDMI output works in photo mode
- Overlays behave the way you expect
- Menus do not ruin recordings
- Output is stable at 1080p
- Power and storage are planned for the session length
- Cable is strain-relieved and does not snag